

The Right Fit Starts Here: How to Measure for Replacement Window Screens
How to measure for replacement window screens comes down to a few simple steps most homeowners can do in under 15 minutes with a tape measure and a notepad.
Quick answer:
- Remove the existing screen from the window frame.
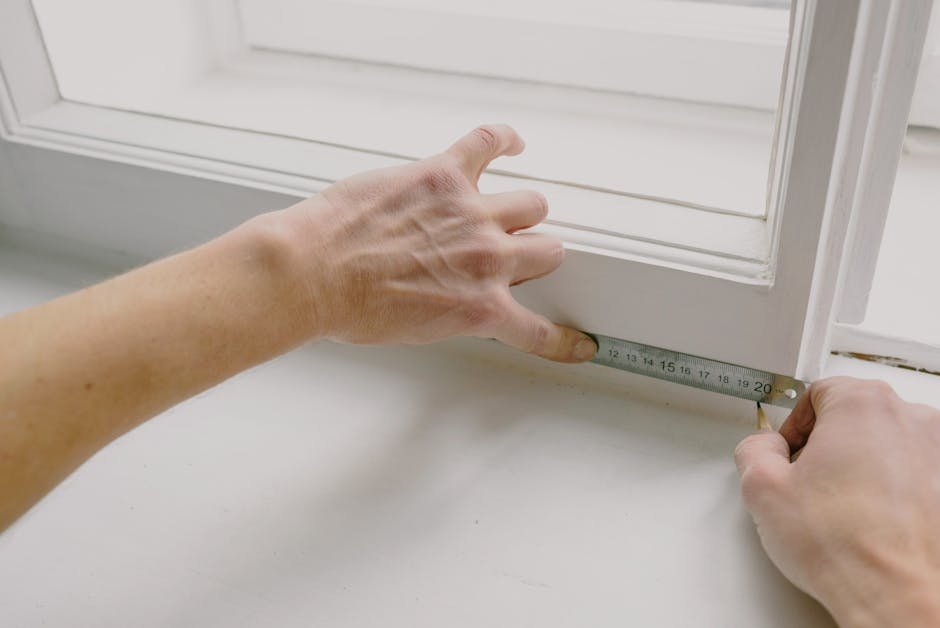
- Measure the width from outside edge to outside edge of the frame — measure at the top and bottom, use the smaller number.
- Measure the height from outside edge to outside edge — measure at the left and right sides, use the smaller number.
- Measure the frame depth (thickness) from the side — typically 5/16″, 3/8″, or 7/16″.
- Record all three numbers (width × height × depth) to the nearest 1/16 inch.
- If no screen exists, measure the window channel opening and subtract 1/8 inch from both width and height for proper fit.
A poorly fitted screen doesn’t just look bad — it lets bugs in. And window screens aren’t built to last forever. The average screen lasts about 15 years, depending on weather exposure, cleaning, and handling. When it’s time for a replacement, getting the measurement right the first time saves you money and frustration.
The good news? This is a very doable DIY task — as long as you know where to measure and what numbers to record.
I’m Nathan Nuttall from M&M Gutters & Exteriors, and after more than 30 years helping Utah homeowners with exterior projects — including windows — I’ve seen how a simple measurement mistake can turn a quick fix into a costly headache. In this guide, I’ll walk you through exactly how to measure for replacement window screens so you get it right the first time.

Easy how to measure for replacement window screens word list:
Essential Tools and Preparation for Measuring Window Screens
Before we dive into the “how-to,” we need to make sure you have the right gear. Accuracy is the name of the game here. A difference of just 1/8 inch can be the gap that lets a family of mosquitoes into your living room. Window screens are a critical component of home maintenance, especially in the varied climate of Northern Utah.
The Gear You’ll Need
- Steel Tape Measure: Leave the cloth sewing tape in the drawer. You need a high-quality metal tape measure. A properly calibrated one is accurate within 1/64 inch, which is exactly the kind of precision we’re looking for.
- Notepad and Pencil: You will be taking multiple measurements (top, middle, bottom). Don’t trust your memory!
- Step Ladder: If you’re measuring windows from the outside or have tall windows, stay safe and use a sturdy ladder.
- Putty Knife or Flathead Screwdriver: These are handy for gently prying out old, stubborn screens without damaging the window frame.
Preparing Your Workspace
Start by clearing away any curtains, blinds, or decorations that might block your access. If you’re working on the second story of your Salt Lake County home, decide if it’s safer to measure from the inside or outside. While measuring from the outside is often more accurate for a snug fit, safety always comes first.
Before you start measuring the screen itself, it’s a great idea to check the window for overall health. If your windows are difficult to open or show signs of rot, you might be dealing with more than just a screen issue. Check out our guide on Measuring Up: How to Get Perfect Window Dimensions Every Time to see if your window frames are still square and level.
Removing Old Screens Safely
To remove a screen from the inside, open the window fully. Look for pull tabs, pins, or springs. Usually, you’ll lift the screen up into the top track and pull the bottom toward you. If you’re outside, start at a lower corner and use your putty knife to gently dislodge the frame. Be careful not to bend the aluminum frame if you plan on using it as a template!
How to Measure for Replacement Window Screens Using an Existing Frame
If your old screen is still mostly intact (even if the mesh is torn), your job just got a lot easier. The most reliable way to get a replacement is to measure the existing frame. This is often referred to as the “outside-to-outside” method.

The Golden Rule: Width First, Height Second
In the window industry, we always list dimensions as Width x Height.
- Measure the Width: Lay the screen flat. Measure from the outside edge of the aluminum frame to the opposite outside edge. Do this at the top and the bottom. Why both? Screens can bow or warp over time. If the numbers differ, use the smaller measurement.
- Measure the Height: Measure from the very top edge to the very bottom edge. Do this on both the left and right sides. Again, if they differ, record the smaller number.
- Measure Frame Thickness: This is a step many DIYers skip, but it’s vital. Turn the screen sideways and measure the depth of the metal frame. In the U.S., there are three standard sizes that cover about 90% of windows.
For more details on this specific technique, you can read our Measure Twice, Screen Once: A Foolproof Method for Replacement Screens blog post.
Standard Frame Thicknesses
Knowing your window material can help you identify the right frame thickness:
| Window Material | Standard Screen Frame Thickness |
|---|---|
| Vinyl Windows | 5/16 inch |
| Aluminum Windows | 3/8 inch |
| Wood Framed Windows | 7/16 inch |
Step-by-Step: How to Measure for Replacement Window Screens
When you are recording these numbers, precision is key. We recommend measuring to the nearest 1/16 inch.
- Avoid Rounding Up: If your measurement is between 24 1/8″ and 24 3/16″, it is better to stay on the smaller side. A screen that is 1/16″ too small will still stay in the track; a screen that is 1/16″ too big simply won’t fit.
- Check the Corners: Measure near the corners rather than the middle. Aluminum frames can bow inward over 15 years of Utah sun and snow, which might give you a “false” smaller reading in the center.
Identifying and Measuring Screen Hardware
Your screen isn’t just mesh and metal; it usually has hardware to keep it in place. You need to note what kind you have and where it sits.
- Tension Springs: These are flat or coiled metal pieces usually at the top or side. They “squish” to let the screen pop into the track.
- Pull Tabs: These are plastic or metal loops used to pull the screen out of the frame.
- Crossbars: On full-height screens, a horizontal bar is often added for strength. If you need a crossbar, measure from the bottom of the frame to the center of the bar.
When ordering, you’ll need to specify the hardware location. We usually measure this “center-to-center” from the nearest corner.
Measuring for New Screens When the Original is Missing
What if the previous homeowner took the screens with them, or a windstorm sent them flying across Tooele County? Don’t panic. You can measure the window opening directly.
Finding the “U-Shaped Lip”
Look at your window frame. You should see a dedicated channel or a U-shaped lip where the screen is meant to sit. This is your target.
- Measure the Width: Place the end of your tape measure inside the screen track on the left and measure across to the inside of the track on the right.
- Measure the Height: Measure from the bottom sill track to the top header track.
- The 1/8-Inch Rule: This is the most important part of how to measure for replacement window screens when no screen is present. You must subtract 1/8 inch from your total width and height. This provides “play” or clearance so you can actually maneuver the screen into the tracks without forcing it.
For a deeper dive into window anatomy, check out our How to Measure Replacement Windows Guide.
Pro Tips for a Snug Fit
- Vertical vs. Horizontal: On some windows, you measure from the vertical lip to the channel. If you’re measuring a window with a deep groove on one side (common in horizontal sliders), put the tape all the way into the deep groove, measure to the opposite edge, and then subtract your clearance.
- Adding vs. Subtracting: Some manufacturers suggest adding 1/8 inch to the height if you are measuring from the lip to the sash. However, the safest bet for most DIY orders is to measure the maximum opening and subtract 1/8 inch for clearance.
- Check for Squareness: Measure the diagonals of the window opening (top left to bottom right, and top right to bottom left). If the two numbers differ by more than 1/4 inch, your window is “out of square.” In this case, you might need a professional to help with a custom fit. Read more in The Double-Hung Window Measurement Handbook: No More Guesswork.
Accounting for Window Types and Hardware Variations
Not all windows are created equal, and neither are their screens. The style of window you have in your Davis County or Weber County home will dictate what kind of screen you need.
Double-Hung and Single-Hung Windows
These usually use half screens that cover only the bottom sash. They typically slide into tracks and are held in place by tension springs at the top.
Horizontal Sliders
These also use half screens, but they move side-to-side. One side of the window frame often has a deeper “pocket” or groove. You’ll want to seat the screen in that deep groove first, then pull it back into the shallower track on the other side.
Casement and Awning Windows
Because these windows crank outward, the screens are located on the inside. These screens often use “plunger bolts” or “butterfly latches” to lock into the interior frame.
Choosing Your Mesh Type
Since you’re replacing the screen anyway, consider upgrading the mesh:
- Standard Fiberglass: The most common and affordable. It’s flexible and won’t dent like aluminum.
- Pet-Resistant Screen: If you have a cat that likes to climb or a dog that paws at the window, this mesh is up to 7x stronger than standard fiberglass.
- Solar Protection: Great for south-facing windows in Utah’s hot summers. These can block up to 65-90% of UV rays, keeping your home cooler and protecting your furniture from fading. According to Energy.gov, solar screens are most effective on windows that receive direct sunlight.
Need help identifying your window style? We’ve got a guide for that: Different Window Styles for Your Home.
Common Mistakes to Avoid When Measuring Window Screens
Even with the best intentions, mistakes happen. Here are the “don’ts” we see most often at M&M Gutters & Exteriors:
- Measuring the Glass Only: This is the #1 mistake. The screen frame sits in the window frame, not against the glass. Always measure the tracks or the old screen frame.
- Ignoring the Depth: If you buy a 7/16″ thick screen for a track designed for 5/16″, it simply won’t slide in.
- Measuring Only One Side: Windows settle. Frames bow. Always measure top/bottom and left/right. Use the smallest measurement to ensure the screen fits.
- Forgetting Hardware: If your window requires tension springs to stay in, and you order a screen without them, it will rattle or fall out during the first Northern Utah canyon wind.
- Assuming All Windows are the Same: Even if two windows look identical, measure them both. In many homes, “standard” sizes can vary by 1/8 inch from room to room.
If you find that your screens are constantly falling out or your windows are drafty, it might be a sign that the windows themselves are failing. Take a look at 11 Signs You Need New Windows for Your Home to see if it’s time for an upgrade.
Frequently Asked Questions about Window Screens
Should I measure the screen or the window opening?
If you have the old screen and it fit well, measure the screen frame (outside-to-outside). It is the most accurate template. If the screen is missing or badly bent, measure the window opening tracks and subtract 1/8 inch for clearance.
How precise do my measurements need to be?
You should measure to the nearest 1/16 inch. While 1/8 inch is often acceptable, 1/16 inch ensures a “professional” fit with no gaps for tiny gnats or “no-see-ums” to get through.
Why do I need to subtract 1/8 inch from my measurements?
Screens need a tiny bit of “wiggle room” to be installed. If the screen is the exact same size as the opening, the friction will make it nearly impossible to slide into the tracks without scratching the paint or bending the screen frame.
Conclusion
Learning how to measure for replacement window screens is a fantastic way to maintain your home’s comfort and curb appeal. By following the “measure twice, order once” rule and paying close attention to your frame thickness and hardware, you can keep the fresh air in and the Utah bugs out.
However, we know that life gets busy, and sometimes windows in older homes in Salt Lake City or Summit County can be tricky. If your windows are out of square, or if you’re looking to replace the windows entirely for better energy efficiency, we are here to help.
At M&M Gutters & Exteriors, we bring over 30 years of experience to every project. We don’t just do gutters; we are your one-stop shop for roofing, siding, and Windows. We even use HOVER 3D visualization technology so you can see exactly how your new windows and screens will look before we ever pull out a tool.
Ready for a perfect fit? Check out our guide on the Best Windows for Your Utah Home or contact us today for a professional consultation. Whether you’re in Salt Lake County or Weber County, we’ve got you covered!