

Why Accurate Measurements Matter
How to measure house windows for replacement correctly can save you hundreds of dollars and prevent frustrating installation delays. The process is straightforward when you follow the right steps:
Quick Answer: The Essential Steps
- Measure Width – Measure inside the jambs at three points (top, middle, bottom). Use the smallest measurement.
- Measure Height – Measure from sill to head jamb at three points (left, center, right). Use the smallest measurement.
- Measure Depth – Measure from interior stop to exterior stop. You need at least 3 1/4 inches.
- Check for Square – Measure diagonally corner-to-corner both ways. Measurements should be within 1/4 inch of each other.
- Round Down – Record your final measurements to the nearest 1/8 inch, always rounding down.
Getting your window measurements wrong is expensive. Order a window that’s too large, and it won’t fit. Order one that’s too small, and you’ll have gaps that leak air and drive up your energy bills. According to the research, even experienced DIYers have “windows of shame” sitting in their garages from measurement mistakes.
But here’s the good news: measuring windows isn’t rocket science. You just need to know which measurements matter and how to take them correctly. This guide will walk you through every step, from understanding window anatomy to handling tricky situations like out-of-square frames in older homes.
Whether you’re replacing one window or planning a whole-house upgrade, accurate measurements are your foundation for success. They ensure proper fit, maximum energy efficiency, and a professional-looking installation. If you’re experiencing signs you need new windows like drafts or condensation, getting the measurements right is your first critical step.
I’m Nathan Nuttall, and I’ve helped Utah homeowners with exterior improvements for over 30 years at M&M Gutters & Exteriors. I’ve seen countless window projects succeed or fail based on the accuracy of initial measurements, and I’ve learned that understanding how to measure house windows for replacement properly is the difference between a smooth installation and a costly headache. Let me show you exactly how to get it right the first time.

Before You Measure: Tools and Terminology
Before we dive into the nitty-gritty of measuring, let’s make sure we’re equipped with the right tools and speaking the same language when it comes to window parts. This preparation will set you up for success and help us avoid any confusion down the line.
Essential Tools for the Job
You don’t need a workshop full of specialized equipment to measure your windows, but having a few key items on hand will make the process much smoother and more accurate. Here’s what we recommend:
- Tape Measure: This is your most crucial tool. A sturdy, metal tape measure that can extend at least 25 feet is ideal. Make sure it’s in good working condition, as a bent or damaged tape can lead to inaccurate readings. If you need a refresher on how to use one effectively, check out this helpful video: How Do I Use a Tape Measure?.
- Pencil and Notepad/Worksheet: You’ll be taking several measurements for each window, and record them immediately and clearly. We highly recommend using a dedicated worksheet to keep everything organized. You can even download our replacement window measurement worksheet to help you keep track.
- Level: A small level (2-4 feet) can be helpful to ensure your measurements are truly horizontal or vertical, especially in older homes where things might not be perfectly plumb or level.
- Carpenter’s Square: While not strictly necessary for every measurement, a carpenter’s square can assist in checking for squareness and ensuring you’re measuring at true 90-degree angles.
- Flashlight: For older homes, a flashlight can illuminate hidden debris, paint buildup, or uneven surfaces that might skew your measurements, especially around the sill.
- A Helper (Optional but Recommended): For larger windows, an extra set of hands can make a world of difference, especially when holding the tape measure steady and double-checking readings.
Understanding Your Window’s Anatomy
To accurately measure for replacement windows, we need to understand the basic parts of the window frame. This isn’t just about jargon; knowing these terms ensures we’re measuring the correct points.

Here are the key components we’ll be referring to:
- Head (or Head Jamb): This is the top, horizontal component of the window frame.
- Jambs: These are the vertical side components of the window frame, running from the head to the sill. You’ll often hear us refer to “side jambs.”
- Sill: This is the bottom, horizontal component of the window frame. It’s typically the part closest to the inside of the window and where the sash rests when the window is closed. Don’t confuse it with the window stool!
- Window Stool: This is the lower trim section that extends from the window into the room, often used as a shelf for plants or decorations. We measure to the sill, not the stool.
- Interior Stop (or Interior Trim): This is the trim piece on the inside of your home that holds the bottom of the window in place and prevents it from moving further inward.
- Exterior Stop (or Exterior Trim): This is the trim piece on the outside of your home that holds the window in place from the exterior.
- Parting Beads/Strips: These are thin strips of wood or vinyl found in older double-hung windows that separate the upper and lower sashes. We’ll ignore these when measuring depth.
- Pulleys: Also found in older double-hung windows, these are part of the counterweight system. We’ll ignore these when measuring depth.
Now that we have our tools ready and know our window parts, let’s get to the actual measuring!
The 4-Step Guide to How to Measure House Windows for Replacement
This is where the rubber meets the road! Our detailed, step-by-step process will guide you through exactly how to measure house windows for replacement, ensuring you capture all the necessary dimensions for a perfect fit. Accuracy is key here – measure twice, order once!
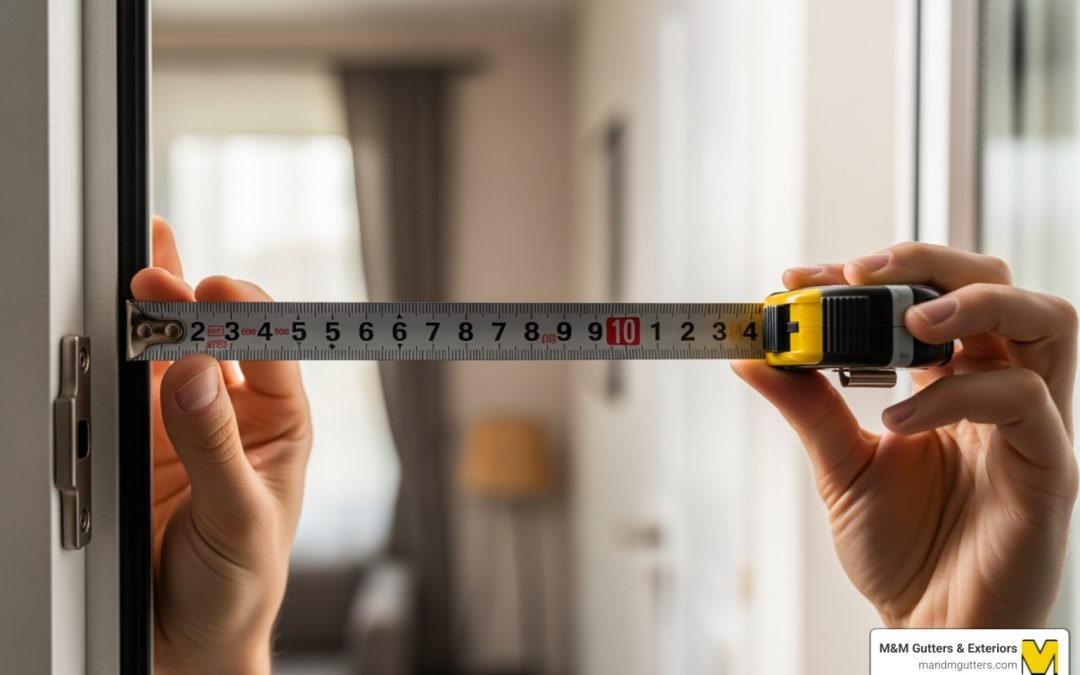
Step 1: Measure the Window Width
Measuring the width is crucial, and it’s not as simple as just one measurement. We need to find the narrowest point of your window opening.
- Measure from Inside Your Home: All primary measurements for replacement windows should be taken from the inside of your house.
- Measure Between the Jambs: Extend your tape measure horizontally from the surface of one side jamb to the surface of the other. Do not measure from trim strips or parting beads.
- Take Three Measurements: Measure the width at three different points:
- Near the top of the window opening.
- At the middle of the window opening.
- Near the bottom of the window opening.
- Identify the Smallest Measurement: Of these three readings, the smallest measurement is the one you will use for your window’s width. This ensures your new window will fit into the tightest spot.
- What if there’s no trim? If your window is finished with drywall instead of jambs, simply measure the distance between the drywall on each side at these three points.

Step 2: Measure the Window Height
Just like with width, height requires precision and multiple measurements to account for any inconsistencies in the opening.
- Measure from the Sill to the Head Jamb: Extend your tape measure vertically from the highest point of the sill (the surface closest to the inside of the window) to the underside of the head jamb (the top of the window opening).
- Take Three Measurements: Measure the height at three different points:
- At the left side of the window opening.
- At the center of the window opening.
- At the right side of the window opening.
- Identify the Smallest Measurement: The shortest of these three height measurements is the one you will use for your window’s height. This guarantees your window won’t be too tall for the opening.
Step 3: Measure the Frame Depth
The frame depth, also known as the jamb depth, determines if your existing frame can accommodate a standard replacement window.
- Measure from Interior to Exterior Stop: From the inside of your home, measure the distance from the inside face of your interior stop (the trim holding the window in on the inside) to the inside face of the exterior stop (the trim holding the window in on the outside).
- Ignore Obstructions: It’s important to ignore any pulleys, parting strips, or other old window components when taking this measurement, as these will typically be removed during a replacement window installation.
- Check for Minimum Depth: For most standard replacement windows, you’ll need a minimum frame depth of 3 1/4 inches. If your depth is less than this, you might need a custom window or a full-frame replacement, which we can discuss during a consultation.
Step 4: Check for Square
A perfectly square window opening is rare, especially in older homes. Checking for squareness helps us understand the condition of your opening and anticipate any installation challenges.
- Measure Diagonally:
- Extend your tape measure from the top-left corner of the window opening (where the head meets the jamb) diagonally down to the bottom-right corner (where the opposite jamb meets the sill). Note this measurement.
- Repeat the process, measuring from the top-right corner diagonally down to the bottom-left corner. Note this measurement.
- Compare the Measurements:
- If the two diagonal measurements are identical or differ by no more than 1/4 inch, your window opening is considered reasonably square. A standard replacement window will work well here.
- If the measurements differ by more than 1/4 inch, your opening is out-of-square. This isn’t a deal-breaker, but it means we’ll need to plan for creative shimming and caulking during installation to ensure a tight, weather-sealed fit. It might also indicate underlying structural issues in very old or settled homes, which we’d want to investigate.
Measuring Different Window Styles and Special Cases
While the 4-step process above covers the basics, different window styles can have unique measurement considerations. Our expertise in different window styles for your home means we understand these nuances.
How to Measure for Double-Hung, Single-Hung, and Sliding Windows
These are some of the most common window types, and our standard 4-step process generally applies well.
- Width: Measure from trim to trim (or jamb to jamb) at the top, middle, and bottom. Use the smallest measurement. For sliding windows, measure from trim to trim at the center.
- Height: Measure from trim to trim (or sill to head jamb) at the left, center, and right. Use the smallest measurement. For sliding windows, measure the height in the middle.
How to Measure for Casement and Awning Windows
Casement (crank-out side-to-side) and awning (crank-out bottom-hinged) windows also follow a similar pattern, but ensure you’re measuring the clear opening.
- Width: Measure the width of your awning or casement window at the center, extending your tape measure horizontally from trim to trim.
- Height: Measure the height of your casement or awning window, extending your tape measure vertically from trim to trim.
- Crank Mechanism: While not a measurement for the window itself, consider the clearance needed for the crank mechanism, especially if existing trim or nearby objects might interfere with operation.
How to Measure for Bay and Bow Windows
Bay and bow windows are multi-panel units that project outward from your home. They require individual attention for each section.
- Measure Each Window Panel Individually: For bay or bow windows, you’ll need to measure the width and height of each individual window panel that makes up the unit.
- Width: Measure the width of each window panel at its center, from jamb to jamb or trim to trim. Make sure to note the width of the center window separately, as it may be different from the side panels.
- Height: Measure the height of each window panel at its center, extending your tape measure vertically from trim to trim.
- Note Angles: While not a direct measurement for ordering, it’s helpful to note the angles at which the panels meet, as this affects the overall bay/bow unit design. A professional will typically handle the precise ordering of these complex units based on your individual panel measurements.
Special Considerations for Older Homes
Utah has many beautiful, historic homes, especially in areas like Salt Lake City and Ogden. These older homes often come with unique quirks that can make window measurement a bit more challenging.
- Settled Frames: Over decades, house foundations can settle, causing window frames to shift and become significantly out-of-square. Our 4-step guide, especially the diagonal check, is vital here. If the difference is more than 1/4 inch, we’ll need to discuss custom solutions or careful shimming during installation.
- Frame Rot and Damage: Always inspect the existing window frame for signs of rot, brittle wood, or water damage. If the frame itself is compromised, it may need to be repaired or fully replaced before a new window can be installed. Measuring into rotted wood will give you inaccurate dimensions and lead to future problems.
- Non-Standard Sizes: Older homes often have windows that don’t conform to modern standard sizes. This usually means custom-sized replacement windows are necessary, making accurate measurement even more critical.
- Debris and Paint Buildup: Years of paint layers or accumulated debris in the sill and jambs can reduce the actual opening size. Clean these areas as best you can before measuring to get the true dimensions.
- Inside vs. Outside: While we measure primarily from the inside for replacement windows, if you suspect significant exterior damage or a very unusual frame, an exterior measurement (from outside casing to outside casing) can sometimes provide additional context for a professional installer.
Dealing with older windows can be tricky, but it’s nothing we haven’t seen before. If you’re feeling overwhelmed, professionals like us are here to help. Sometimes, the best first step is to consult with experts who can guide you through the process, especially when you’re trying to find the best window installation near you.
Finalizing Your Measurements and Avoiding Pitfalls
We’re almost there! Once you’ve taken all your measurements, the next step is to record them correctly and understand how they translate to ordering replacement windows. We also want to highlight some common mistakes to ensure your project goes off without a hitch.
How to Record and Format Your Measurements
Proper recording is just as important as accurate measuring.
- Label Each Window Clearly: Give each window a unique identifier (e.g., “Kitchen, North Wall,” “Bedroom 1, Left,” “Living Room Bay, Center Panel”). This prevents confusion, especially if you’re replacing multiple windows.
- Use a Worksheet: As mentioned, a dedicated measurement worksheet (like the one we linked earlier) helps organize your data.
- Record All Three Readings: Even though you’ll use the smallest, record all three width and height measurements for each window. This provides a valuable reference if there are questions later.
- Format: Width by Height (W x H): This is the standard industry format. Always list the width measurement first, followed by the height. For example, if your smallest width is 30 inches and your smallest height is 50 inches, you’d record it as 30″ x 50″.
- Round Down to the Nearest 1/8 Inch: This is a critical rule! For example, if your measurement is 36 and 15/16 inches, round down to 36 and 7/8 inches. If it’s 36 and 1/16 inches, round down to 36 inches. This slight reduction ensures the window will fit, allowing for shims and caulk for a perfect seal. Most manufacturers will build the window slightly smaller than ordered anyway to ensure it fits, so don’t subtract extra yourself unless explicitly instructed by the manufacturer.
- Create a Simple Drawing: For complex windows or openings, a quick sketch can help visualize the measurements and any unique features.
Common Pitfalls to Avoid When You Measure House Windows for Replacement
Even with the best intentions, it’s easy to make mistakes. Here are some common pitfalls we’ve seen homeowners encounter:
- Measuring the Old Window Itself: Never measure the glass or the visible part of the old window frame. We need the dimensions of the opening where the new window will sit.
- Forgetting to Double-Check: We can’t stress this enough. Measure each dimension at least twice, and if possible, have your helper verify the numbers.
- Ignoring Frame Damage: Measuring over rotten wood or a severely damaged frame will result in an inaccurate order and installation headaches. Address any frame issues first.
- Rounding Incorrectly: Always round down to the nearest 1/8 inch. Rounding up or not rounding at all can lead to a window that’s too large.
- Measuring Only Once: Taking a single measurement for width or height is a recipe for disaster in anything but a perfectly square, new construction opening. Always take three.
- Assuming All Windows Are the Same: Even if windows look identical, measure each one individually. Variations in framing, settling, and previous installations mean each opening can be unique.
- Not Accounting for Obstructions: Make sure your measurements consider any interior or exterior obstructions that might affect the window’s operation (e.g., crank handles hitting wall trim).
How to Measure for Window Screens
If you’re also planning to replace or add window screens, a slightly different approach is needed.
- Measure Screen Channels: For existing screens, measure the width and height of the screen channels (the tracks where the screen sits) rather than the screen itself.
- Width Adjustment: Measure the channel width in three places and use the smallest measurement. You might need to subtract 1/8 inch from this measurement for a proper fit, depending on the screen type.
- Height Adjustment: Measure the channel height in three places and use the smallest measurement. You might need to add 1/8 inch to this measurement.
- Manufacturer Instructions: Always refer to the specific manufacturer’s instructions for screen measurement, as adjustments can vary.
Frequently Asked Questions about Measuring Windows
We get a lot of questions about measuring windows, so let’s tackle some of the most common ones.
What’s the difference between a replacement window and a new construction window?
This is a fundamental distinction!
- Replacement Windows (or Insert/Pocket Replacements): These are designed to fit into your existing window frame. The old sashes, hardware, and sometimes interior stops are removed, but the original frame (the head, jambs, and sill) remains. The new window unit is then “inserted” into this existing frame. This is often a quicker and less invasive installation.
- New Construction Windows (or Full-Frame Replacements): These windows include a nailing fin around the perimeter and are installed directly into the rough opening of your wall, attaching to the wall studs. This means the entire old window, including its frame, is removed, often along with some exterior siding or interior trim. New construction windows are typically used for new builds or when the existing window frame is rotten, damaged, or severely out-of-square.
Do my measurements need to be perfect?
Yes, accuracy is crucial. However, it’s important to understand how manufacturers typically handle these measurements. Most manufacturers build replacement windows about 1/4 to 1/2 inch smaller than the ordered dimensions (the smallest measurements you provide). This slight reduction is intentional; it ensures the window will fit into the opening and leaves room for shims and caulk to create a plumb, level, and weather-tight seal.
So, while your measurements need to be as precise as possible, always use your smallest, most exact measurement and then round down to the nearest 1/8 inch. Do not subtract extra inches yourself, as this could result in a window that’s too small.
When should I hire a professional to measure my windows?
We encourage homeowners to understand the measurement process, but there are definitely times when bringing in a professional is the smartest move. Consider a professional if:
- You have complex window types: Large bay or bow windows, custom shapes, or very unusual window designs can be challenging to measure accurately.
- Your home is older or severely out-of-square: If your diagonal measurements are off by more than 1/4 inch, or if you suspect significant settling or structural issues, a professional can assess the situation and recommend the best approach.
- You’re dealing with extensive frame rot or damage: A professional can properly evaluate the extent of the damage and ensure the opening is sound before measurement.
- You’re simply not confident: If you’re nervous about taking measurements yourself, or if you’re not comfortable with the precision required, a professional service guarantees a perfect fit, saving you potential headaches and costs down the line.
At M&M Gutters & Exteriors, we offer professional measurement services. Our team has 30+ years of experience working with homes across Salt Lake City, Salt Lake County, Utah County, and beyond. We’ll ensure your replacement windows fit perfectly, every time.
From Measurement to Installation: The Next Step
We’ve covered a lot of ground on how to measure house windows for replacement. You now have the tools, the terminology, and the step-by-step guide to confidently measure your home’s windows. Remember the importance of accurate measurements: they save you money, ensure energy efficiency, and guarantee a smooth installation process.
While DIY measurement is a great way to get started and understand your project, sometimes the complexity of older homes or specific window styles makes professional measurement invaluable. Our team at M&M Gutters & Exteriors specializes in providing a one-stop solution for exterior home remodeling in Salt Lake City, Utah, and the surrounding counties like Summit, Tooele, Davis, and Weber. We combine our 30+ years of experience with modern tools like 3D visualization using HOVER to ensure every detail is perfect.
For a guaranteed perfect fit and professional installation for your home’s new Windows, contact our team today. We’re here to help you upgrade your home with confidence.