

Why Accurate Measurements Matter for Screen Replacement
How to measure window screen replacement correctly is the difference between a perfect fit and a frustrating trip back to the hardware store. Here’s the quick answer:
Quick Method:
- With existing screen: Measure width and height from outside edge to outside edge of the frame. Measure frame depth from the side.
- Without existing screen: Measure inside the window channels, subtract 1/8 inch from width, and add 1/8 inch to height.
- Precision: Always measure to the nearest 1/16 inch.
- Verify: Measure twice at different points and use the smallest measurement.
You never think about window screens until they break. One moment you’re enjoying a breeze, the next you’re dealing with a torn mesh that lets in every bug in the neighborhood. The good news? Replacing a window screen is one of the easiest home improvement projects you can tackle yourself—if you get the measurements right.
Window screens average a 15-year lifespan, but weather, pets, and simple wear can cut that short. When replacement time comes, accurate measurements are everything. A screen that’s even 1/8 inch off can refuse to fit or fall out at the slightest touch.
This guide walks you through every step of measuring for screen replacement, whether you have the old screen to work with or need to measure an empty window frame. You’ll learn which tools to use, how to read a tape measure down to 1/16 inch, and the specific techniques for different window types.
I’m Nathan Nuttall, and over 30 years at M&M Gutters & Exteriors, I’ve helped countless Utah homeowners master how to measure window screen replacement correctly the first time. Let me show you the same foolproof method our team uses every day.
, 2. Remove old screen or identify window channels, 3. Measure width and height to nearest 1/16 inch, 4. Measure frame depth, 5. Double-check all measurements and record as Width x Height x Depth - how to measure window screen replacement infographic infographic-line-5-steps-elegant_beige")
Before You Measure: Prep and Assessment
Before you even think about grabbing that tape measure, let’s take a moment to assess the situation. Is it truly time for a full screen replacement, or could a quick patch do the trick? And what exactly do you need in your toolkit to get the job done right?

When to Replace vs. Patch
Patching a window screen can be a temporary fix for minor damage, but there comes a point when a full replacement is the smarter, more effective option. Here’s how we determine when it’s time to retire the old screen and bring in a fresh one:
- Large Tears or Multiple Holes: While small punctures might be patchable, extensive damage or numerous holes can compromise the screen’s integrity and appearance. If the tear is too large to patch effectively, or if you find yourself patching more than once, it’s a clear sign for replacement.
- Frame Corrosion or Damage: The mesh isn’t the only part of a screen that wears out. If the screen frame itself is bent, corroded, or broken, patching the mesh won’t solve the underlying structural issue. A damaged frame means the screen won’t sit properly in the window, leaving gaps for pests. Corners, in particular, are tough to patch and often show the first signs of frame failure.
- Brittle or Shiny Mesh: Over time, exposure to the harsh Utah sun and elements can cause the screen mesh to become brittle, faded, or shiny. Brittle mesh is prone to tearing, while a shiny appearance often indicates weather damage and a loss of its original protective properties. Loose mesh also signals that it’s losing its durability and effectiveness.
- Beyond Its Lifespan: Window screens generally have a 15-year lifespan. If your screens are significantly older than that, they’re likely past their prime, even if they don’t show obvious damage. Aging screens are less effective at blocking UV rays, resisting insects, and maintaining their shape.
- Lifestyle Changes: Sometimes, it’s not just about damage. Maybe you’ve recently adopted a pet that’s prone to scratching, and you need a more durable, pet-resistant screen. Or perhaps you’re looking for improved energy efficiency with a solar screen. If your current screen no longer meets your needs, it’s time for a change.
If you’re noticing these issues, or if you’re seeing other signs that point to larger window problems, it might be time to consider more than just a screen replacement. Sometimes, a compromised screen is an indicator of deeper issues with the window itself. Check out our guide on 11 Signs You Need New Windows for Your Home for more insights. For general background on how screens work and common materials, you can also see this overview of window screens.
Essential Tools and Skills
Getting accurate measurements is the cornerstone of a successful screen replacement. And like any good craftsman, you need the right tools for the job. Luckily, the list is short and sweet:
- Metal Tape Measure: This is your MVP. We recommend a high-quality metal tape measure because it stays rigid and provides the most accurate readings. Avoid cloth tape measures, as they can stretch and lead to inaccuracies. Always ensure your tape measure is calibrated and free of kinks; even a slight bend can throw off your measurements.
- Notepad & Pen/Pencil: You’ll be taking several measurements, and it’s easy to forget them or mix them up. Having a dedicated place to jot down your numbers, clearly labeling width, height, and depth, is crucial.
- Putty Knife (Optional): If you’re dealing with a screen that’s stuck or difficult to remove from the outside, a putty knife can help you gently pry it free without damaging the window frame.
- Ladder or Step Stool (Optional): For those harder-to-reach windows, a stable ladder or step stool is a must for safety and accuracy.
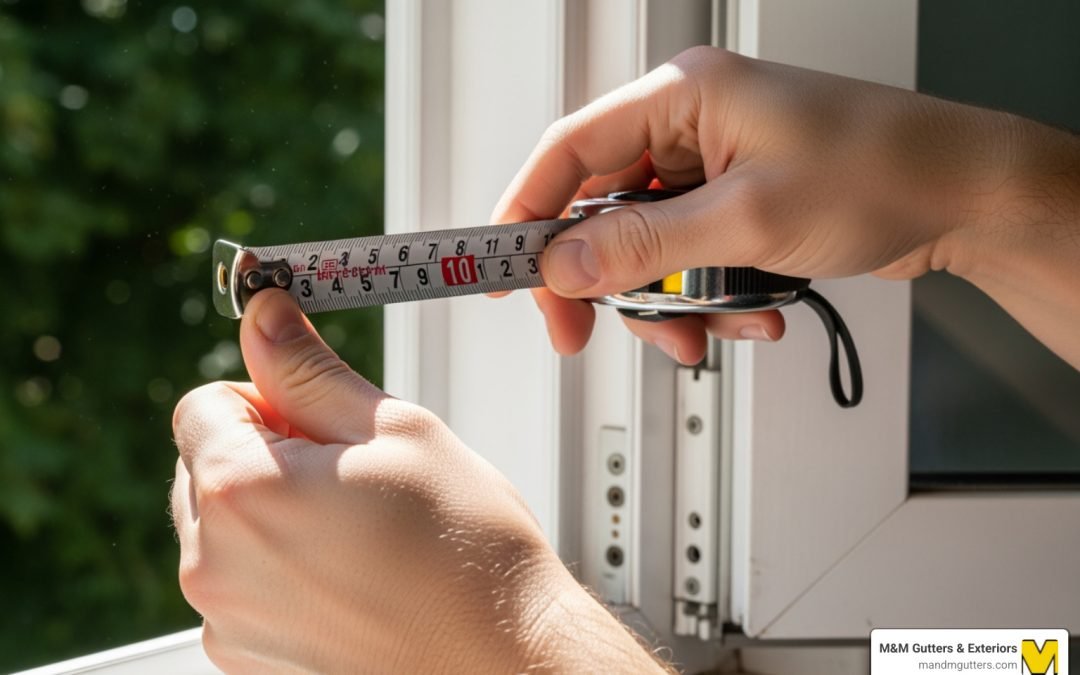
How to Read a Tape Measure
A tape measure might seem straightforward, but reading it precisely is a skill. For window screen measurements, we need to be accurate down to the nearest 1/16 of an inch.
- Inches: These are the largest, numbered markings.
- Half-Inches (1/2″): The next longest mark after the inch.
- Quarter-Inches (1/4″): Halfway between the whole inch and the half-inch marks.
- Eighth-Inches (1/8″): Halfway between the quarter-inch marks.
- Sixteenth-Inches (1/16″): The smallest, most frequent marks. These are typically the shortest lines between the eighth-inch marks.
To read accurately, align the start of your tape measure precisely. Then, find the largest mark before your endpoint (the inch mark), then count the subsequent marks (1/2, 1/4, 1/8, 1/16) until you reach your measurement. Precision is key! A properly calibrated tape measure is accurate within 1/64″, so aiming for 1/16″ is a realistic and necessary goal for how to measure window screen replacement.
Importance of Precision and Causes of Inaccuracy
Why such a fuss about 1/16 inch? Because a screen that’s too big simply won’t fit, and one that’s too small will leave gaps for insects and compromise its function. We’re talking about a snug, secure fit that keeps the bugs out and the peace in.
Common causes of inaccuracies include:
- Using an improper tool: As mentioned, cloth tape measures are a no-go.
- Kinked or bent tape measure: These will always give you a false reading.
- Not holding the tape measure straight: A crooked tape will give you a longer measurement than the actual dimension.
- Measuring inconsistently: Always measure at multiple points (top, middle, bottom for width; left, center, right for height) and use the smallest measurement to account for any bowing or inconsistencies in the window frame. This is a crucial best practice!
- Rounding numbers: Resist the urge to round to the nearest whole or half-inch. That 1/16 inch can make all the difference.
How to Measure Window Screen Replacement With the Old Screen
The easiest way to determine the size of your new screen is by measuring your existing one, assuming it fit correctly. This method is our go-to when possible, as it takes much of the guesswork out of the equation.

Step 1: Measure Width, Height, and Depth
First things first, you need to carefully remove the old screen from your window. This process can vary slightly depending on your window type.
- Removing from the Inside: For many modern windows, you can open the window, pull small tabs or plungers on the screen, and then tilt the screen inward to remove it.
- Removing from the Outside: Older or exterior-mounted screens might require a gentle pry with a putty knife or screwdriver to free them from the window frame. Be careful not to damage the window.
Once the screen is out, lay it flat on a clean, level surface. This ensures you get true measurements without any bowing or twisting that might occur if measured while still in the window.
Now, let’s get down to the how to measure window screen replacement specifics:
- Measure Width (Outside Edge to Outside Edge): Place your metal tape measure across the top of the screen frame, measuring from the outermost edge of one side to the outermost edge of the other. Repeat this measurement at the bottom of the screen frame.
- Pro Tip: Measure at the corners rather than just the middle. Window screens can sometimes bow or constrict over time due to sun and heat exposure. Measuring at the corners ensures you capture the actual dimensions needed for a snug fit.
- Record: Write down the smallest of your width measurements. This will be your screen’s width.
- Measure Height (Outside Edge to Outside Edge): Repeat the same process for the height. Measure from the outermost edge of the top frame to the outermost edge of the bottom frame, first on the left side, then on the right side.
- Record: Write down the smallest of your height measurements. This will be your screen’s height.
- Measure Frame Depth/Thickness: This measurement is crucial to ensure the new screen frame will fit into the window channel. Look at the screen frame from the side. Use your tape measure to determine its thickness, typically around 5/16″ to 1″.
- Record: Note this measurement. Standard insect screen frames are often 5/16″ x 3/4″, while solar screens might be 5/16″ x 1″.
When recording your measurements, always list them as Width x Height x Depth (e.g., 30 1/2″ W x 48 3/8″ H x 5/16″ D). This clear format helps prevent any confusion when ordering.
Measuring for a New Screen Without the Old Frame
Sometimes, the old screen is long gone, completely mangled, or perhaps you’re adding a screen to a window that never had one. Don’t fret! We can still get accurate measurements by directly measuring the window opening itself. This method requires a bit more precision and understanding of your window’s components.
Step 2: How to Measure Window Screen Replacement in the Channel
When the old screen isn’t available, we need to measure the window’s screen channels or tracks—the recessed areas where the screen frame sits. This is critical for how to measure window screen replacement in these scenarios.
- Identify Screen Channels and the Lip: Look inside your window frame. You’ll typically see channels or tracks on the top, bottom, and sides where the screen is meant to slide or sit. One of the side channels (often the shallower one, especially in slider windows) will have a small “lip” or ridge that the screen frame rests against. This lip is your starting point for measurements.
- For a deeper dive into window measurements generally, our How to Measure Replacement Windows Guide can provide additional context on window components.
- Measure Width (Inside Channel to Inside Channel):
- Place the end of your metal tape measure behind the lip of one side channel.
- Extend the tape measure horizontally across the window opening to the opposite side channel.
- Measure to the inside edge of that opposite channel.
- Crucial Adjustment: From this measurement, subtract 1/8 inch. This ensures the new screen frame has enough clearance to slide in and out easily without being too tight.
- Record: Note this adjusted width.
- Measure Height (From Bottom Lip to Top Channel):
- Place the end of your tape measure behind the bottom lip (where the screen will rest).
- Extend the tape measure vertically up to the inside edge of the top screen channel.
- Crucial Adjustment: For many standard single or double-hung windows, you’ll add 1/8 inch to this measurement. This addition helps the screen sit snugly against the top channel and ensures enough tension for a secure fit.
- Record: Note this adjusted height.
- Measure Channel Depth: Just like with an existing screen, you need to know the depth of the channel to ensure your new screen frame isn’t too thick or too thin.
- Measure from the inner edge of one channel wall to the inner edge of the opposing channel wall. This tells you how much space you have for the screen frame’s thickness.
- Record: Note this depth. The depth should measure at least 3-1/4 inches for some window types, but for screens, you’re looking for the depth of the screen channel itself.
Remember to measure at multiple points (top, middle, bottom for width; left, center, right for height) and always use the smallest measurement obtained before applying the 1/8 inch adjustments. This accounts for any slight inconsistencies or bowing in the window frame, ensuring your new screen will fit into the narrowest part of the opening.
Special Cases and Pro Tips for Accuracy
We’ve covered the basics, but windows come in all shapes and sizes, and some have unique features that require special consideration. Here are our best practices and specific instructions for different scenarios to ensure your how to measure window screen replacement project is a success.
Best Practices for Double-Checking Measurements
The mantra “measure twice, order once” isn’t just a catchy phrase; it’s a golden rule in our line of work. We’d even suggest “measure three times, order once” for good measure (pun intended!).
- Measure Each Window Individually: This is non-negotiable. Even if two windows look identical, construction inconsistencies or settling over time can lead to slight variations. Never assume measurements from one window will apply to another. Each window is unique, just like each of us!
- Use the Smallest Measurement: When you measure width (top, middle, bottom) and height (left, center, right), always use the smallest measurement you get for each dimension. This ensures the screen will fit into the tightest spot of the opening.
- Check for Squareness: An out-of-square window can be tricky. You can check for squareness by measuring the diagonals of the window opening. If the two diagonal measurements differ by more than 1/4 inch, the window is not perfectly square. In such cases, taking the smallest width and height measurements is even more critical. You might need to adjust your screen order or consider a professional consultation.
- Record Everything: Write down all your measurements clearly, labeling width, height, and depth. Also, note any specific hardware (springs, clips, etc.) and its location.
Measuring Different Window Types
While the general principles remain, specific window types in Utah homes might require slightly different measuring approaches for screens:
- Slider Windows: These typically have a half-screen that slides horizontally.
- Width: Measure from the lip of the shallower vertical screen channel across to the opposite side channel. Subtract 1/8 inch.
- Height: Measure between the top and bottom horizontal screen channels. Subtract 1/8 inch.
- Double-Hung Windows: These usually have a half-screen in the bottom sash.
- Height: Find the bottom lip of the frame that holds the screen. Insert your tape measure behind this lip, extend vertically to the top of the screen channel, and add 1/8 inch to this measurement.
- Width: Slip the tape behind the lip of one side channel and measure across to the opposite channel. Subtract 1/8 inch from this measurement.
- Single-Hung Windows: Similar to double-hung, but only the bottom sash moves. The screen measurement technique is generally the same as for the bottom sash of a double-hung window.
- Windows with a Center Mullion: If your window has a vertical divider (mullion) in the middle and you need two separate screens, you’ll measure each section.
- Width: Place your tape measure on an outer horizontal edge and measure across half the window to the center of the mullion.
- Height: Obtain the vertical measurement as you would for a single-hung window.
Understanding the variety of window styles can help you identify your specific needs. Take a look at our guide on Different Window Styles for Your Home for more information.
Accounting for Special Features and Avoiding Mistakes
Some windows have unique features that directly impact screen measurements.
- Solar Screens: These darker, heavier screens are designed to block more UV light and heat.
- Measurement: Collect the width and height dimensions from the outer edges of the existing solar screen frame. Then, subtract 1/8 inch from both the width and height.
- Screens Secured with Brick Clips: Common in some brick homes, these screens attach directly to the exterior brick facade.
- Measurement: For both width and height, measure from brick edge to brick edge. Then, subtract 1 inch from both dimensions. This larger subtraction accounts for the clips and ensures the screen fits correctly within the brick opening.
Common Mistakes to Avoid
We’ve seen it all in our 30+ years in the business, and here are the most frequent blunders when measuring for screens:
- Rounding Numbers: As we’ve emphasized, that 1/16 inch matters! Don’t round up or down significantly.
- Not Noting Hardware Location: If your screen uses special hardware like tension springs, plungers, or lift tabs, their exact location and type can affect the screen’s fit. Make a note of these.
- Assuming Identical Windows: We can’t stress this enough. Every window is unique.
- Measuring Only Once: Always measure at least twice, preferably three times, at different points.
- Ignoring Window Frame Depth: The depth of your screen channel is just as important as width and height for a proper fit.
- Forgetting Tolerances: Remember to apply the necessary additions or subtractions (like the 1/8 inch or 1 inch) based on whether you’re measuring a screen or the window channel, and the specific window type.
By following these detailed steps and best practices, you’ll be well on your way to getting accurate measurements and perfectly fitting replacement screens for your Utah home.
Frequently Asked Questions about Measuring Window Screens
We know you might have a few lingering questions, so we’ve compiled some of the most common ones we hear about how to measure window screen replacement.
What is the recommended precision for window screen measurements?
For the most accurate and snug fit, we always recommend measuring down to the nearest 1/16 of an inch. Rounding up or down significantly can result in a screen that is either too tight to install or too loose, leaving gaps for insects to sneak through. This level of precision ensures your replacement screen functions perfectly.
What if my diagonal measurements differ by more than 1/4 inch?
If you measure the diagonals of your window opening and they differ by more than 1/4 inch, it indicates that your window frame is not perfectly square. This is quite common, especially in older homes in Salt Lake City and the surrounding areas. When this happens, it’s even more crucial to re-measure the width at the top, middle, and bottom, and the height at the left, center, and right. Always use the smallest measurement for both width and height. This ensures that the screen will fit into the narrowest part of the opening without getting stuck or warped, even if the window itself is a bit off-square.
What’s the difference between measuring for a window frame and measuring for the screen itself?
This is a great question and a common point of confusion!
- Measuring for the Screen (or for screen replacement): When we talk about how to measure window screen replacement, we are determining the exact dimensions that the finished screen frame needs to be. This measurement takes into account the specific channels, lips, and hardware designed to hold the screen in place, often requiring small adjustments (like adding or subtracting 1/8 inch) to ensure a perfect fit within the existing window opening.
- Measuring for a Window Frame (e.g., for a full replacement window): This involves measuring the rough opening where an entire new window unit would be installed. This is a much larger and more complex measurement process, often requiring removal of trim and measuring from stud to stud. It’s about fitting a whole new window into the wall, not just a screen into an existing window. For more on this, you can refer to our replacement window guide.
In short, measuring for a screen is about fitting a component into an existing window, while measuring for a window frame is about fitting a new window into your home’s structure.
Get a Perfect Fit Every Time
Congratulations! You’re now equipped with the knowledge and confidence to tackle how to measure window screen replacement like a pro. We’ve walked through the essential tools, the critical precision of 1/16 inch, and the specific techniques for various window types, whether you have an old screen or not. Remember our golden rule: measure twice (or three times!), order once. This simple practice will save you time, money, and a whole lot of frustration.
Taking on DIY projects like this can be incredibly rewarding, empowering you to improve your home with your own hands. However, we understand that sometimes, the job is too complex, too high up, or you simply prefer the peace of mind that comes with professional expertise.
At M&M Gutters & Exteriors, we’ve been serving Salt Lake City, Utah, and the surrounding counties like Salt Lake County, Utah County, Summit County, Tooele County, Davis County, and Weber County for over 30 years. Our team of experienced professionals specializes in comprehensive window services in Utah, ensuring a perfect fit and flawless installation for every home. From measurements to installation, we’re here to provide a seamless experience, guaranteeing your new screens (and windows!) are installed right the first time.