

Ice dams are a common challenge for Utah homeowners, especially during the winter. They can loosen gutters and break shingles, allowing water to seep into your home’s interior. When installed correctly, heating roof cables offer an elegant solution.
If you’re trying to decide between a DIY and professional installation, this guide is for you. We offer a comprehensive analysis of the costs, benefits, and risks to help you decide whether to do it yourself or leave the roof heating cable installation to the pros.

Understanding Roof Heat Cable Basics
When preparing your roof and gutters for winter, consider adding electric heating roof cables in areas where ice can accumulate and create dams. Focus on:


Skylights
Chimney bases
Roof valleys


Gutters and downspouts
Areas around dormers
Eaves and roof edges
What Are Roof Heat Cables?
Roof heat cables, also called de-icing cables or heat tape, are designed to integrate with your new or existing weather protection system. Gutters, roofs, dormers, and other roofing components work together to protect your home’s interior and foundation from moisture and runoff. Roof heat cables and gutter heat tape installation add an extra layer of necessary protection by preventing ice from damming after heavy snow.
How Installation Works
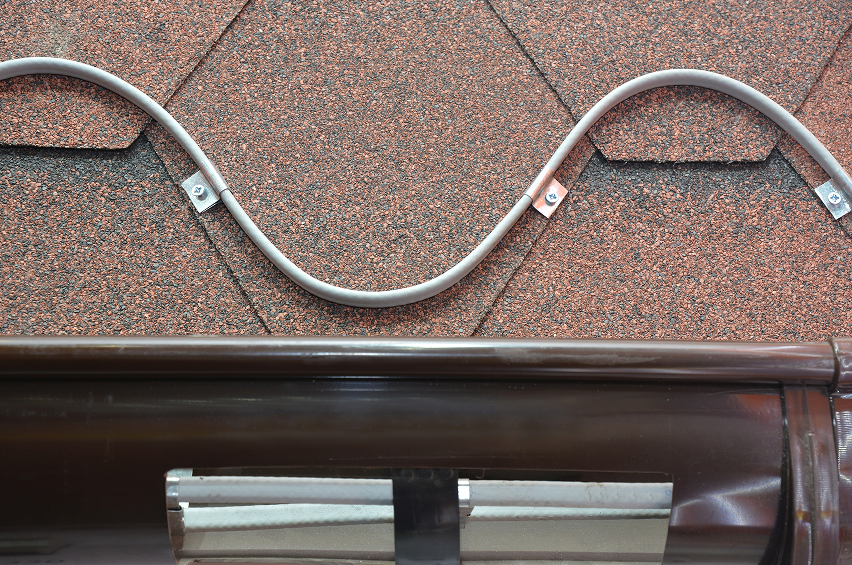
Roof heat cables keep ice from solidifying in sub-zero temperatures. Correct installation is crucial, as wrong placement can worsen damming. For best results, run cables in a zigzag pattern along the edge of the roof, with extensions into gutters and downspouts.
")
DIY Installation Process Overview
Installing roof heating cables for your roof requires careful planning and attention to safety. Below, we explain how to install roof heat cables on your own.
Essential Materials Needed
Gather the following materials to start your DIY installation:


Basic tools and safety equipment: You’ll also need a drill or driver and a flathead screwdriver to complete basic installation. Since you will operate from a height, use appropriate protective equipment to prevent dangerous falls.
Key Installation Steps
Once you have the appropriate equipment, follow these DIY steps for roof heating cables installation:
1: Planning and Preparation
Before beginning, check local regulations and building codes. You may need to call your local building agency for details.
Measure the roof edges and gutters accurately and calculate how much cable you need for zigzags along the entire roofline, as well as gutters and downspouts. Mark the location for each mounting clip with chalk. Your zigzags should run approximately six inches beyond the wall line below your eaves.
Check your home’s exterior for an appropriate GFI outlet or other power source consistent with manufacturer instructions.

Space the cable clips 24 inches apart on the marked locations and create a zigzag pattern. Run the cable through the clips and extend the cable into gutters and downspouts. Secure the cable at each fixture, but be careful not to overtighten.

Follow the manufacturer’s instructions to connect your cables and plug them in. Be sure to test your system before winter weather hits, and verify that all electrical connections and fixtures are secure.
Professional Installation Benefits
If your cables require complex electrical work or you aren’t sure about how to manage any part of the installation process, hire a professional installer with M&M Gutters. We’re a full-service exterior contractor with extensive experience installing roof heat cable on Utah homes.
Expert Advantages
Hiring a professional installer may cost more than a DIY installation, but this cost is largely offset by the installation quality. A professional will know how to install heat tape in gutters and secure the cable to your roofing appropriately.
Additionally, professional installation companies carry insurance coverage and liability protection to address any accidents, installation damage, or other situations that could arise. When you install cables on your own, you foot the bill for any damage or injuries that occur.
At M&M Gutters, we install roof heating cables on a variety of roofing and gutter designs and materials. Our installers have the technical expertise and equipment to do the job right.
Long-Term Value
With a professional installer, you have less risk of damage due to improper installation. In fact, professional heat cable installers typically offer warranty protection on your installation. That means any errors, such as roofing damage or failed equipment, are generally covered by the installer.
Roof heating cable systems typically require maintenance to keep them in good working order. A professional installation company will offer maintenance support, including periodic inspections and repairs as needed.

Cost Comparison: DIY vs. Professional
Understandably, cost is a major concern for those considering roof heating cable installation.
The costs for a DIY heat roof de-icing cable kit with a 100-foot cable range from approximately $70 to $400, or about $0.70 to $4 per foot. Longer cables and specialized roofing installations can cost $800 or more. This doesn’t include the cost of safety equipment, tools, or any additional electrical work.
Many homeowners find it easier to estimate the cost of professional roof heating cable installation using per-foot pricing instead of hourly labor rates. Professionally installed systems typically range from $10 to $14 per linear foot, with labor costs between $6 and $10 per foot (plus the cost of the cable), depending on the product chosen.
This per-foot approach keeps pricing transparent and predictable, which is especially helpful when you’re installing cables across long roof edges, gutters, or downspouts. Larger, more complex roofs or multi-story homes may fall toward the higher end of the range.
Operating costs for installed roof heat cables depend on cable length, power per foot, and usage. Most heat cables use between six and nine watts per foot per hour, which translates to between $40 and $60 per month.
Reduce operating costs by installing heat sensors, moisture leads, and timers that tailor your usage to conditions instead of operating continuously.

Making Your Decision: DIY or Professional?
Ultimately, the choice between DIY vs. professional roof heat cable installation depends on your budget, experience, and roof configuration.
You have basic roofing experience
You have experience with electrical equipment
You are comfortable working at heights
You have a simple, single-story roof configuration
You have proper safety equipment
Your home has a complex roof design or multiple stories
You have limited DIY experience with electrical or roofing work
You have time constraints or safety concerns
You want warranty protection and guaranteed results
Safety Considerations for Both Options
Regardless of whether you choose professional or DIY heat tape roof installation, the following safety guidelines apply:


Quote Your Next Project Today!
Installing roof de-icing cables is an excellent way to protect your home from ice dams and water damage. M&M Gutters offers professional roof heat cable installation and Ice Melting System services with a comprehensive warranty.